withopen(corpus_path, "r", encoding=encoding) as f: ifself.corpus_lines isNoneandnot on_memory: for _ in tqdm.tqdm(f, desc="Loading Dataset", total=corpus_lines): self.corpus_lines += 1# 数一下一共有多少行
if on_memory: self.lines = [line[:-1].split("\t") # 去掉换行符,按 tab 分成句子对 for line in tqdm.tqdm(f, desc="Loading Dataset", total=corpus_lines)] self.corpus_lines = len(self.lines)
line = self.file.__next__() if line isNone: self.file.close() self.file = open(self.corpus_path, "r", encoding=self.encoding) for _ inrange(random.randint(self.corpus_lines ifself.corpus_lines < 1000else1000)): self.random_file.__next__() line = self.random_file.__next__() return line[:-1].split("\t")[1]
无论如何先取
1
2
t1 = 第 index 行的第一句
t2 = 第 index 行的第二句
get_corpus_line取决于 on_memory,如果True直接按 index 取,否则按数据流顺序从文件里读下一行(如果文件读完从头开始)
classTorchVocab(object): def__init__(self, counter, max_size=None, min_freq=1, specials=['<pad>', '<oov>'], vectors=None, unk_init=None, vectors_cache=None): self.freqs = counter counter = counter.copy() min_freq = max(min_freq, 1) # 设定最小词频 self.itos = list(specials) # frequencies of special tokens are not counted when building vocabulary # in frequency order for tok in specials: del counter[tok]
classWordVocab(Vocab): def__init__(self, texts, max_size=None, min_freq=1): counter = Counter() for line in texts: ifisinstance(line, list): words = line else: words = line.replace("\n", "").replace("\t", "").split() # 以空格分词 for word in words: counter[word] += 1 super().__init__(counter, max_size=max_size, min_freq=min_freq)
seq = [self.stoi.get(word, self.unk_index) for word in sentence] # 可选加特殊 token 起始标记和结束标记 if with_eos: seq += [self.eos_index] # this would be index 1 if with_sos: seq = [self.sos_index] + seq # 保存“未 padding 前”的真实长度(很多下游任务会用) origin_seq_len = len(seq) # 根据seq_len 判断是否需要填充或者截断 if seq_len isNone: pass eliflen(seq) <= seq_len: seq += [self.pad_index for _ inrange(seq_len - len(seq))] else: seq = seq[:seq_len]
return (seq, origin_seq_len) if with_len else seq
# to_seq 的逆操作 deffrom_seq(self, seq, join=False, with_pad=False): words = [self.itos[idx] if idx < len(self.itos) else"<%d>" % idx for idx in seq if with_pad or idx != self.pad_index] # join控住是否拼接成字符串 return" ".join(words) if join else words
输入sentence同样两种形式
1
seq = [self.stoi.get(word, self.unk_index) for word in sentence]
在词表里 → 对应 id
不在词表里 → <unk>(坍缩态)
origin_seq_len = len(seq) 用途通常是:
RNN(真实长度)
attention mask
loss 归一化
1 2 3 4 5 6
words = [ self.itos[idx] if idx < len(self.itos) else"<%d>" % idx for idx in seq if with_pad or idx != self.pad_index ]
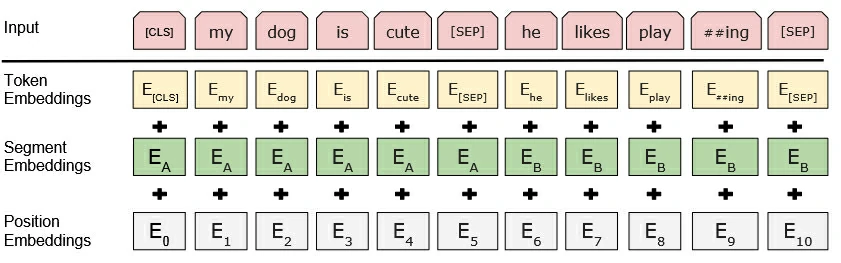
classBERTEmbedding(nn.Module): """ BERT Embedding which is consisted with under features 1. TokenEmbedding : normal embedding matrix 2. PositionalEmbedding : adding positional information using sin, cos 2. SegmentEmbedding : adding sentence segment info, (sent_A:1, sent_B:2) sum of all these features are output of BERTEmbedding """
# 1) Do all the linear projections in batch from d_model => h x d_k query, key, value = [l(x).view(batch_size, -1, self.h, self.d_k).transpose(1, 2) for l, x inzip(self.linear_layers, (query, key, value))]
# 2) Apply attention on all the projected vectors in batch. x, attn = self.attention(query, key, value, mask=mask, dropout=self.dropout)
# 3) "Concat" using a view and apply a final linear. x = x.transpose(1, 2).contiguous().view(batch_size, -1, self.h * self.d_k)
classSublayerConnection(nn.Module): """ A residual connection followed by a layer norm. Note for code simplicity the norm is first as opposed to last. """
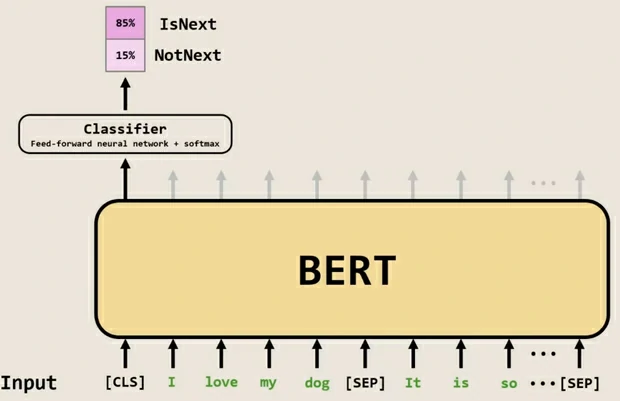
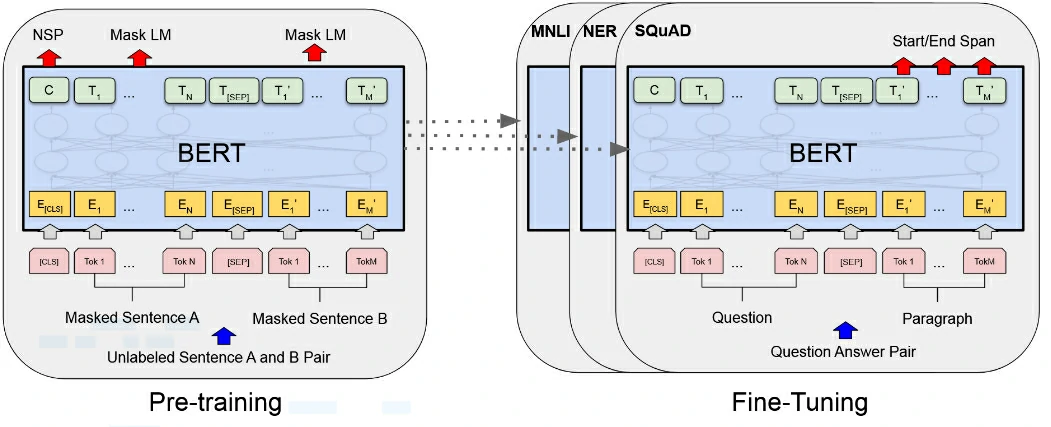
classBERTTrainer: """ BERTTrainer make the pretrained BERT model with two LM training method. 1. Masked Language Model : 3.3.1 Task #1: Masked LM 2. Next Sentence prediction : 3.3.2 Task #2: Next Sentence Prediction please check the details on README.md with simple example. """
def__init__(self, bert: BERT, vocab_size: int, train_dataloader: DataLoader, test_dataloader: DataLoader = None, lr: float = 1e-4, betas=(0.9, 0.999), weight_decay: float = 0.01, warmup_steps=10000, with_cuda: bool = True, cuda_devices=None, log_freq: int = 10): """ :param bert: BERT model which you want to train :param vocab_size: total word vocab size :param train_dataloader: train dataset data loader :param test_dataloader: test dataset data loader [can be None] :param lr: learning rate of optimizer :param betas: Adam optimizer betas :param weight_decay: Adam optimizer weight decay param :param with_cuda: traning with cuda :param log_freq: logging frequency of the batch iteration """
# Setup cuda device for BERT training, argument -c, --cuda should be true cuda_condition = torch.cuda.is_available() and with_cuda self.device = torch.device("cuda:0"if cuda_condition else"cpu")
# This BERT model will be saved every epoch self.bert = bert # Initialize the BERT Language Model, with BERT model self.model = BERTLM(bert, vocab_size).to(self.device)
# Distributed GPU training if CUDA can detect more than 1 GPU if with_cuda and torch.cuda.device_count() > 1: print("Using %d GPUS for BERT" % torch.cuda.device_count()) self.model = nn.DataParallel(self.model, device_ids=cuda_devices)
# Setting the train and test data loader self.train_data = train_dataloader self.test_data = test_dataloader
# Setting the Adam optimizer with hyper-param self.optim = Adam(self.model.parameters(), lr=lr, betas=betas, weight_decay=weight_decay) self.optim_schedule = ScheduledOptim(self.optim, self.bert.hidden, n_warmup_steps=warmup_steps)
# Using Negative Log Likelihood Loss function for predicting the masked_token self.criterion = nn.NLLLoss(ignore_index=0)
self.log_freq = log_freq
print("Total Parameters:", sum([p.nelement() for p inself.model.parameters()]))
defiteration(self, epoch, data_loader, train=True): """ loop over the data_loader for training or testing if on train status, backward operation is activated and also auto save the model every peoch :param epoch: current epoch index :param data_loader: torch.utils.data.DataLoader for iteration :param train: boolean value of is train or test :return: None """ str_code = "train"if train else"test"
# Setting the tqdm progress bar data_iter = tqdm.tqdm(enumerate(data_loader), desc="EP_%s:%d" % (str_code, epoch), total=len(data_loader), bar_format="{l_bar}{r_bar}")
for i, data in data_iter: # 0. batch_data will be sent into the device(GPU or cpu) data = {key: value.to(self.device) for key, value in data.items()}
# 1. forward the next_sentence_prediction and masked_lm model next_sent_output, mask_lm_output = self.model.forward(data["bert_input"], data["segment_label"])
# 2-1. NLL(negative log likelihood) loss of is_next classification result next_loss = self.criterion(next_sent_output, data["is_next"])
# 2-2. NLLLoss of predicting masked token word mask_loss = self.criterion(mask_lm_output.transpose(1, 2), data["bert_label"])
# 2-3. Adding next_loss and mask_loss : 3.4 Pre-training Procedure loss = next_loss + mask_loss
# 3. backward and optimization only in train if train: self.optim_schedule.zero_grad() loss.backward() self.optim_schedule.step_and_update_lr()

.webp)


 (1).png)