全局背景的设置 设置流程:
第一步:设置图片 第二步:引入相关样式 第三步:增加插件脚本 参考链接
修改主题的配置文件 _config.butterfly.yml,编辑 index_img、background、footer_bg 选项,设置网站背景,并将主页顶部图和页脚背景改为透明。
1 2 3 4 5 6 7 8 9 10 11 12 13 14 15 16 index_img: transparent background: url(https://example.com/img/background.jpg) footer_bg: transparent
新建一个文件,位于 source/css/modify.styl,并增加以下内容
1
2
3
4
5
6
7
8
9
10
11
12
13
14
15
16
17
18
19
20
21
22
23
24
25
26
27
28
29
30
31
32
33
34
35
36
37
38
39
40
41
42
43
44
45
46
47
48
49
50
@import 'nib' #page-header &, &:before background : transparent !important &.post-bg , &.not-home-page height : 280px !important #post-info bottom : 40px !important #page-site-info top : 140px !important @media screen and (max-width : 768px ) &.not-home-page height : 200px !important #post-info bottom: 10px !important #page-site-info top: 100px !important .top-img height : 250px margin: -50px -40px 50px border-top-left-radius: inherit border-top-right-radius: inherit background-position: center center background-size: cover transition: all 0.3s @media screen and (max-width : 768px ) height : 230px margin: -36px -14px 36px [data-theme='dark'] & filter: brightness(0.8 ) // 页脚 #footer:before background-color: alpha(#FFF, .5 ) [data-theme='dark'] & background-color: alpha(#000 , .5 ) #footer-wrap, #footer-wrap a color : #111 transition: unset [data-theme='dark'] & color : var(--light-grey)
在主题配置文件 _config.butterfly.yml 的 inject.head 引入样式。modify.styl 会被 Hexo 渲染成 modify.css 文件,所以引入时要写成 modify.css
新建一个文件,位于 scripts/modify.js,并增加以下内容
1
2
3
4
5
6
7
8
9
10
11
12
13
14
15
16
17
18
19
20
21
22
'use strict' ;const cheerio = require ('cheerio' );function insertTopImg ($ ) { let header = $('#page-header' ); if (header.length === 0 ) return ; let background = header.css ('background-image' ); if (!background) return ; $('#post, #page, #archive, #tag, #category' ).prepend (`<div class="top-img" style="background-image: ${background} ;"></div>` ); } hexo.extend .filter .register ('after_render:html' , function (str, data ) { let $ = cheerio.load (str, { decodeEntities : false }); insertTopImg ($); return $.html (); });
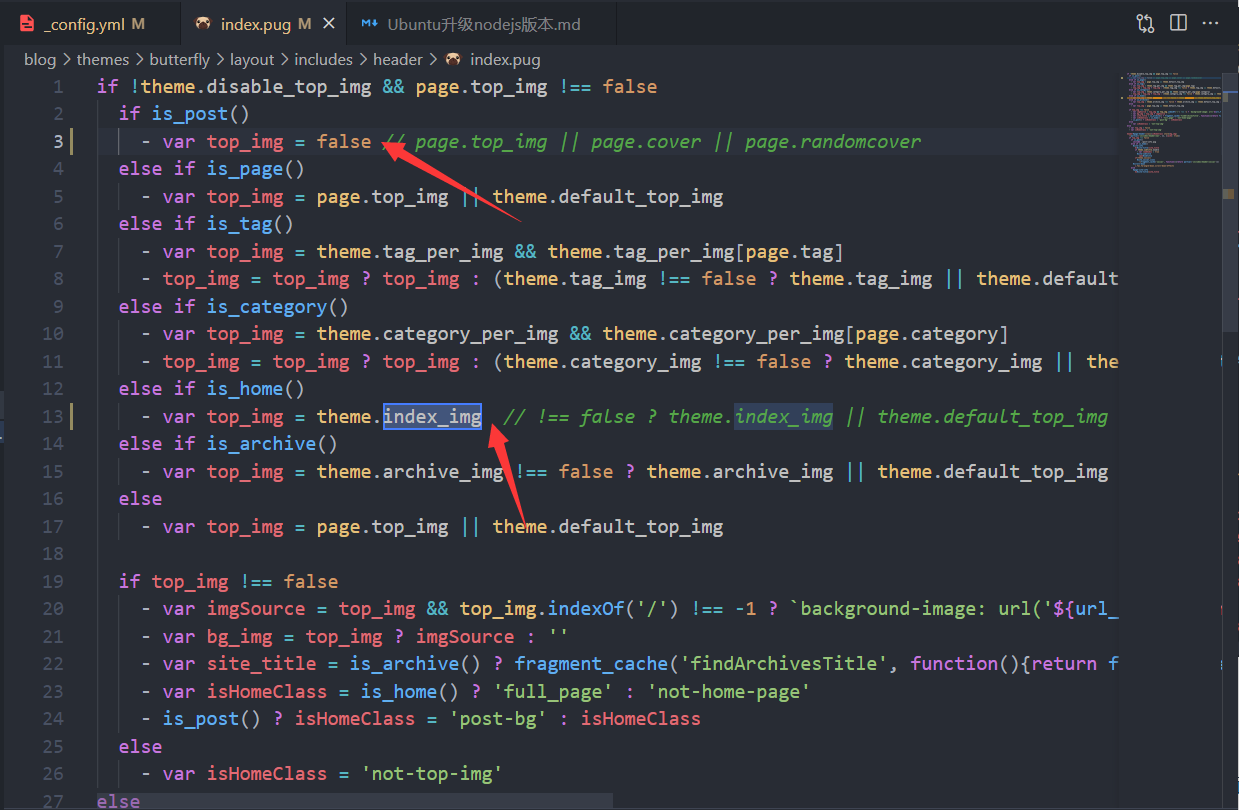
删除post页顶部图 找到位于/themes/butterfly/layout/includes/header/index.pug
打开后寻找is_post() and is_home()
修改后如下图
文章透明样式设置 在个人的css文件下添加(本站为:\themes\butterfly\source\css\custom.css)
1 2 3 4 5 6 7 8 9 10 11 12 13 14 15 16 17 18 19 20 21 22 23 24 25 26 #aside_content .card-widget , #recent-posts >.recent-post-item , .layout_page >div :first-child :not (.recent-posts ), .layout_post >#page , .layout_post >#post , .read-mode .layout_post >#post { background : rgba (255 ,255 ,255 ,.6 ); } #aside-content >.card-widget { background : rgba (255 ,255 ,255 ,.6 ); } #aside-content >.sticky_layout >.card-widget { background : rgba (255 ,255 ,255 ,.6 ); } .layout >#post { background : rgba (255 ,255 ,255 ,.7 ); } .layout >#page { background : rgba (255 ,255 ,255 ,.6 ); } .layout >#archive { background : rgba (255 ,255 ,255 ,.6 ); }
修改段落样式 Butterfly 在 H1~H6 样式上使用了 fontawesome.com 上的图标,引用的是 Unicode 形式
小风车代码实现:
小风车样式 小风车转起来 风车转速 风车转动方向
在主题配置文件里面改动
1
2
3
4
5
6
beautify: enable: true field: post title-prefix-icon: '\f863' title-prefix-icon-color: '#F47466'
在blog/source/css/custom.css(自己创建的配置文件) 文件中加入以下代码
1 2 3 4 5 6 7 8 9 10 11 12 13 14 15 16 17 18 19 20 21 22 23 24 25 26 27 h1 ::before , h2 ::before , h3 ::before , h4 ::before , h5 ::before , h6 ::before { -webkit-animation : ccc 1.6s linear infinite ; animation : ccc 1.6s linear infinite ; } @-webkit-keyframes ccc { 0% { -webkit-transform : rotate (0deg ); transform : rotate (0deg ) } to { -webkit-transform : rotate (-1turn ); transform : rotate (-1turn ) } } @keyframes ccc { 0% { -webkit-transform : rotate (0deg ); transform : rotate (0deg ) } to { -webkit-transform : rotate (-1turn ); transform : rotate (-1turn ) } }
修改上述代码部分,数字越大越快
1 2 3 4 5 h1 ::before , h2 ::before , h3 ::before , h4 ::before , h5 ::before , h6 ::before { -webkit-animation : ccc 1.6s linear infinite ; animation : ccc 1.6s linear infinite ; }
修改上述代码部分,-1为逆时针,1为顺时针
1 2 3 4 5 6 7 8 9 10 11 12 13 14 15 16 17 18 19 20 21 @-webkit-keyframes ccc { 0% { -webkit-transform : rotate (0deg ); transform : rotate (0deg ) } to { -webkit-transform : rotate (-1turn ); transform : rotate (-1turn ) } } @keyframes ccc { 0% { -webkit-transform : rotate (0deg ); transform : rotate (0deg ) } to { -webkit-transform : rotate (-1turn ); transform : rotate (-1turn ) } }
这时候的小风车可能有些单调,还可以进行颜色、大小的修改
小风车颜色css 风车动态效果 参考链接
在之前的css代码后跟上
1
2
3
4
5
6
7
8
9
10
11
12
13
14
15
16
17
18
19
20
21
22
23
24
25
26
27
28
29
30
31
32
33
34
35
36
#content-inner .layout h1 ::before { color : #ef50a8 ; margin-left : -1.55rem ; font-size : 1.3rem ; margin-top : -0.23rem ; } #content-inner .layout h2 ::before { color : #fb7061 ; margin-left : -1.35rem ; font-size : 1.1rem ; margin-top : -0.12rem ; } #content-inner .layout h3 ::before { color : #ffbf00 ; margin-left : -1.22rem ; font-size : 0.95rem ; margin-top : -0.09rem ; } #content-inner .layout h4 ::before { color : #a9e000 ; margin-left : -1.05rem ; font-size : 0.8rem ; margin-top : -0.09rem ; } #content-inner .layout h5 ::before { color : #57c850 ; margin-left : -0.9rem ; font-size : 0.7rem ; margin-top : 0.0rem ; } #content-inner .layout h6 ::before { color : #5ec1e0 ; margin-left : -0.9rem ; font-size : 0.66rem ; margin-top : 0.0rem ; }
鼠标碰到小风车转速变慢及变色
设置鼠标碰到标题时,小风车跟随标题变色,且像是被光标阻碍了,转速变慢。鼠标离开恢复转速。也可以设置为 none 鼠标碰到停止转动
1
2
3
4
5
6
7
8
#content-inner .layout h1 :hover , #content-inner .layout h2 :hover , #content-inner .layout h3 :hover , #content-inner .layout h4 :hover , #content-inner .layout h5 :hover , #content-inner .layout h6 :hover { color : #49b1f5 ; } #content-inner .layout h1 :hover ::before , #content-inner .layout h2 :hover ::before , #content-inner .layout h3 :hover ::before , #content-inner .layout h4 :hover ::before , #content-inner .layout h5 :hover ::before , #content-inner .layout h6 :hover ::before { color : #49b1f5 ; -webkit-animation : ccc 3.2s linear infinite ; animation : ccc 3.2s linear infinite ; }
侧边栏天气时钟 安装方法:
安装插件 配置插件 可选操作 参考链接
Git命令
1 npm install hexo-butterfly-clock --save
可以选择在主题配置文件_config.butterfly.yml或者_config.yml中添加以下代码,个人建议在_config.yml中添加便于修改
1 2 3 4 5 6 7 8 9 10 11 12 13 14 15 16 17 electric_clock: enable: true priority: 5 enable_page: all exclude: layout: type: class name: sticky_layout index: 0 loading: https://npm.elemecdn.com/hexo-butterfly-clock/lib/loading.gif clock_css: https://npm.elemecdn.com/hexo-butterfly-clock/lib/clock.min.css clock_js: https://npm.elemecdn.com/hexo-butterfly-clock/lib/clock.min.js ip_api: https://pv.sohu.com/cityjson?ie=utf-8
因为有些博客是设置为全屏背景并且透明的,这个时钟自身带有背景,可以修改自己增加的css文件进行时钟背景的去除
1
2
3
4
#aside-content .aside-content > .sticky_layout > .card-widget .card-clock > .card-glass > .card-background { background-color : unset ; box-shadow : unset ; }
侧边栏小人样式 代码实现流程
第一步:修改源码 第二步:修改主题配置 参考文章
找到 /themes/butterfly/layout/includes/widget/card_announcement.pug 文件,添加最后一行代码:
1
2
3
4
5
6
7
if theme.aside.card_announcement.enable .card-widget.card-announcement .item-headline i.fas.fa-bullhorn.card-announcement-animation span= _p('aside.card_announcement') .announcement_content!= theme.aside.card_announcement.content .twopeople!= theme.aside.card_announcement.twopeople
在主题配置文件_config.butterfly.yml 中,Ctrl + F 搜索定位到 card_announcement,在 content 下,新增 twopeople 配置项:(这里用到三个CDN,可以直接使用,但也建议你保存后放到自己目录,以免后续本站调整防盗链策略,导致功能失效。 )
1
2
3
4
5
6
7
8
card_announcement: enable: true content: 保持理智,相信明天 twopeople: '<div class="twopeople"><div class="container"style="height:200px;"><canvas class="illo"width="800"height="800"style="max-width: 200px; max-height: 200px; touch-action: none; width: 640px; height: 640px;"></canvas></div> <script src="https://cdn.jsdelivr.net/gh/Justlovesmile/CDN/js/twopeople1.js"></script> <script src="https://cdn.jsdelivr.net/gh/Justlovesmile/CDN/js/zdog.dist.js"></script> <script id="rendered-js" src="https://cdn.jsdelivr.net/gh/Justlovesmile/CDN/js/twopeople.js"></script> <style>.twopeople{margin:0;align-items:center;justify-content:center;text-align:center}canvas{display:block;margin:0 auto;cursor:move}</style></div>'
引用阿里图标 打开阿里图标 ,选择自己需要的图标加购物车,最后添加到项目
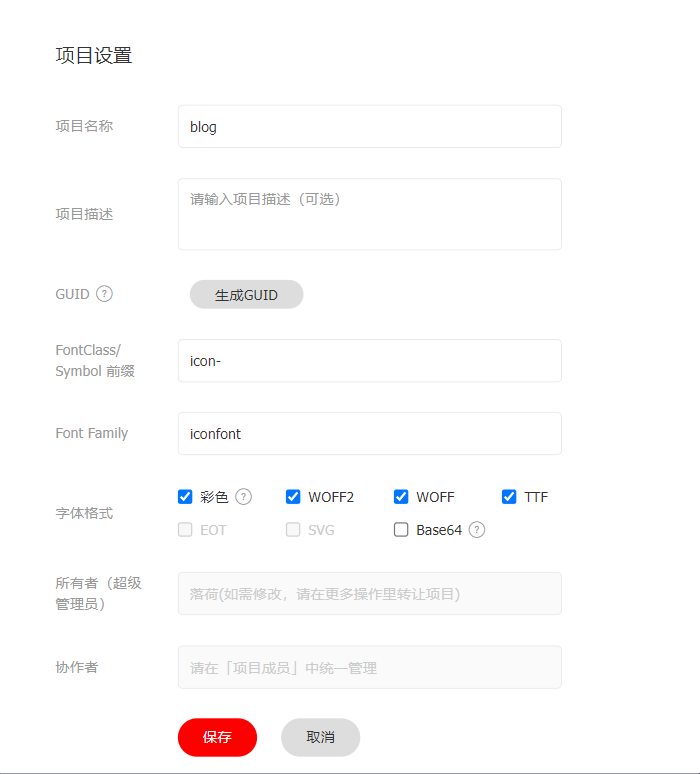
创建项目且添加图标后注意几个地方:
修改项目设置里的字体格式为彩色,点击复制下方的css代码链接
在主题配置文件引入css
1
2
3
inject: head: - <link rel="stylesheet" href="//at.alicdn.com/t/×××.css">
然后就可以直接用啦,注意当时设置的fontclass前缀和fontfamily是什么,可以直接就用默认的
导航栏举例: 社交符号举例
1
2
3
4
5
6
7
8
9
10
menu: 首页: / || iconfont icon-shouye 时间轴: /archives/ || iconfont icon-rili 标签: /tags/ || iconfont icon-biaoqian 留言板: /comments/ || iconfont icon-liuyan 朋友圈: /link/ || iconfont icon-icon_pengyouquan 关于: /about/ || iconfont icon-lianjie
1
2
3
4
5
social: iconfont icon-QQ : https://wuyaohui06022.oss-cn-chengdu.aliyuncs.com/blog/202204111721328.png || QQ iconfont icon-weixin: https://wuyaohui06022.oss-cn-chengdu.aliyuncs.com/blog/202204111721775.png || 微信 iconfont icon-bilibili: https://space.bilibili.com/277953459?spm_id_from=333.1007.0.0 || bilibili iconfont icon-GitHub: https://github.com/YaoHui-Wu06022 || Github